
From Seed to Seedling
Germination Guides
Soaking Cannabis Seeds Before Planting — Water Germination Method
Soak cannabis seeds the right way in 12–24 hours. Master water germination with our step-by-step guide for healthy, strong seedlings.
Soak cannabis seeds in room-temperature dechlorinated water (20–25°C / 68–77°F) for 12–24 hours. Seeds are ready when they sink to the bottom and a small white radicle becomes visible. Do not exceed 24 hours without close monitoring — oxygen deprivation beyond 48 hours kills the embryo. Transfer immediately to a damp paper towel or pre-moistened growing medium.
Soaking cannabis seeds before planting is one of the most reliable ways to trigger fast, consistent germination. Submerging a seed in water starts imbibition — the biological process by which it absorbs water and fires up its internal chemistry, softening the seed coat in the process. The problem most guides create is confusion around duration. You'll find advice ranging from 8 hours to 72 hours depending on which forum you land on. This guide cuts through that contradiction with a clear recommendation grounded in seed biology, and covers the post-soak transition protocol that most other guides leave out entirely. Complete Germination Guide
Why Should You Soak Cannabis Seeds Before Planting?
Soaking softens the seed coat and activates germination. When a cannabis seed is submerged in water, imbibition begins — water molecules penetrate the outer shell, dissolving dormancy-maintaining compounds and triggering the embryo to release enzymes that break down stored food reserves. This process accelerates radicle emergence compared to planting a dry seed directly into soil.
Three practical reasons to soak before planting:
- Faster radicle emergence — pre-soaked seeds typically crack in 12–24 hours versus 2–5 days in dry medium
- Built-in viability check — the float test lets you identify potentially weak seeds before committing them to your grow
- Improved germination rate — the seed coat is already softened when transferred, reducing the mechanical effort needed for the embryo to push through
What Do You Need to Soak Cannabis Seeds?
You need a small clean glass, quality water, a warm dark location, and nothing else. A shot glass or small ceramic cup works well — glass is preferable to plastic because it is easier to clean and does not leach residues. The container should hold enough water to fully submerge the seeds with at least a centimetre of water above them.
Materials checklist:
- Clean glass or ceramic shot glass
- Dechlorinated, RO, or distilled water (see water quality section below)
- A thermometer to verify water temperature (20–25°C / 68–77°F)
- A dark, warm location: a cabinet above the refrigerator, a seedling heat mat set to low, or a warm shelf
- Tweezers or a small spoon for transfer — never use bare fingers on a cracked seed with an exposed radicle
How Long Should You Soak Cannabis Seeds in Water?
The standard soak window is 12–24 hours. Most healthy, recently stored seeds will show a cracked shell and visible radicle within 18–24 hours. The contradictory advice you see online (8h, 48h, 72h) is not wrong in every context — it reflects real variation based on seed age, coat hardness, and genetics — but it is unhelpful without context.
Here is how to read the soak:
What Water Should You Use to Soak Cannabis Seeds?
Use pH-neutral, dechlorinated water — ideally between pH 6.0 and 7.0. Water quality directly affects imbibition efficiency. Chlorine and chloramine, used to treat municipal water supplies, can inhibit enzyme activity at the seed coat and harm the emerging radicle.
Chlorine vs chloramine — an important Canadian distinction:
Most municipalities in Toronto, Vancouver, Montreal, and Calgary now use chloramine rather than chlorine for water treatment. Chloramine does NOT off-gas from sitting in an open container for 24 hours, unlike chlorine. If you are using tap water from a Canadian municipal supply, letting it sit overnight is not sufficient. You need one of the following:
- RO (reverse osmosis) water — removes chloramine and mineral salts; ideal
- Distilled water — chloramine-free, but stripped of all minerals; add a small amount of CalMag if you use it repeatedly
- Activated carbon filter — countertop pitcher filters (Brita, etc.) remove chloramine effectively
- Dechlorinator drops — aquarium-grade sodium thiosulfate or ascorbic acid-based dechlorinators work in minutes
- Cold tap water directly from the tap — both temperature shock and chloramine exposure
- Sparkling or mineral water — carbonation and high mineral content are not beneficial at this stage
- Water above 30°C / 86°F — warm water holds less dissolved oxygen and can encourage bacterial growth
Step-by-Step: How to Soak Cannabis Seeds
This is the complete protocol from prep to transfer.
Step 1 — Prepare your water Fill a clean glass with your chosen water source. Check pH — 6.0–7.0 is the target. If using tap water, dechlorinate first (see water quality section). Verify temperature: 20–25°C / 68–77°F. Below 20°C, warm it slightly or sit the glass on a heat mat.
Step 2 — Place seeds in water Drop seeds gently into the glass. They will likely float initially — this is normal. Air pockets inside the seed coat cause the buoyancy. It does not mean the seeds are dead.
Step 3 — Store in a dark, warm location Cover the glass loosely with a piece of cardboard or a small plate to block light. Place in a warm location (20–25°C). Do not refrigerate, do not place near a heat vent.
Step 4 — Check at 8 hours Seeds should have swollen. Most will have sunk or be hovering near the bottom. If all seeds are still floating, gently press them under the surface with a clean pencil or chopstick — not your fingers at this stage.
Step 5 — Check at 12–18 hours Most seeds should now be resting on the bottom. Look for a hairline crack in the shell — the seed coat separating ahead of radicle emergence. Tap any remaining floaters. If they sink and stay down, they are viable and absorbing water. If they persistently float and feel hollow when pressed, they may be non-viable.
Step 6 — At 18–24 hours, look for the radicle A small white tap root (1–5 mm) may now be visible. The seed is ready to transfer. Do not wait for the radicle to grow longer — past 5 mm it becomes fragile and easy to snap during handling.
Step 7 — Transfer to your growing medium Use tweezers. Radicle-down when going into soil or rockwool. If using a paper towel, lay the seed radicle-side down on the damp surface. Keep the container closed and warm.
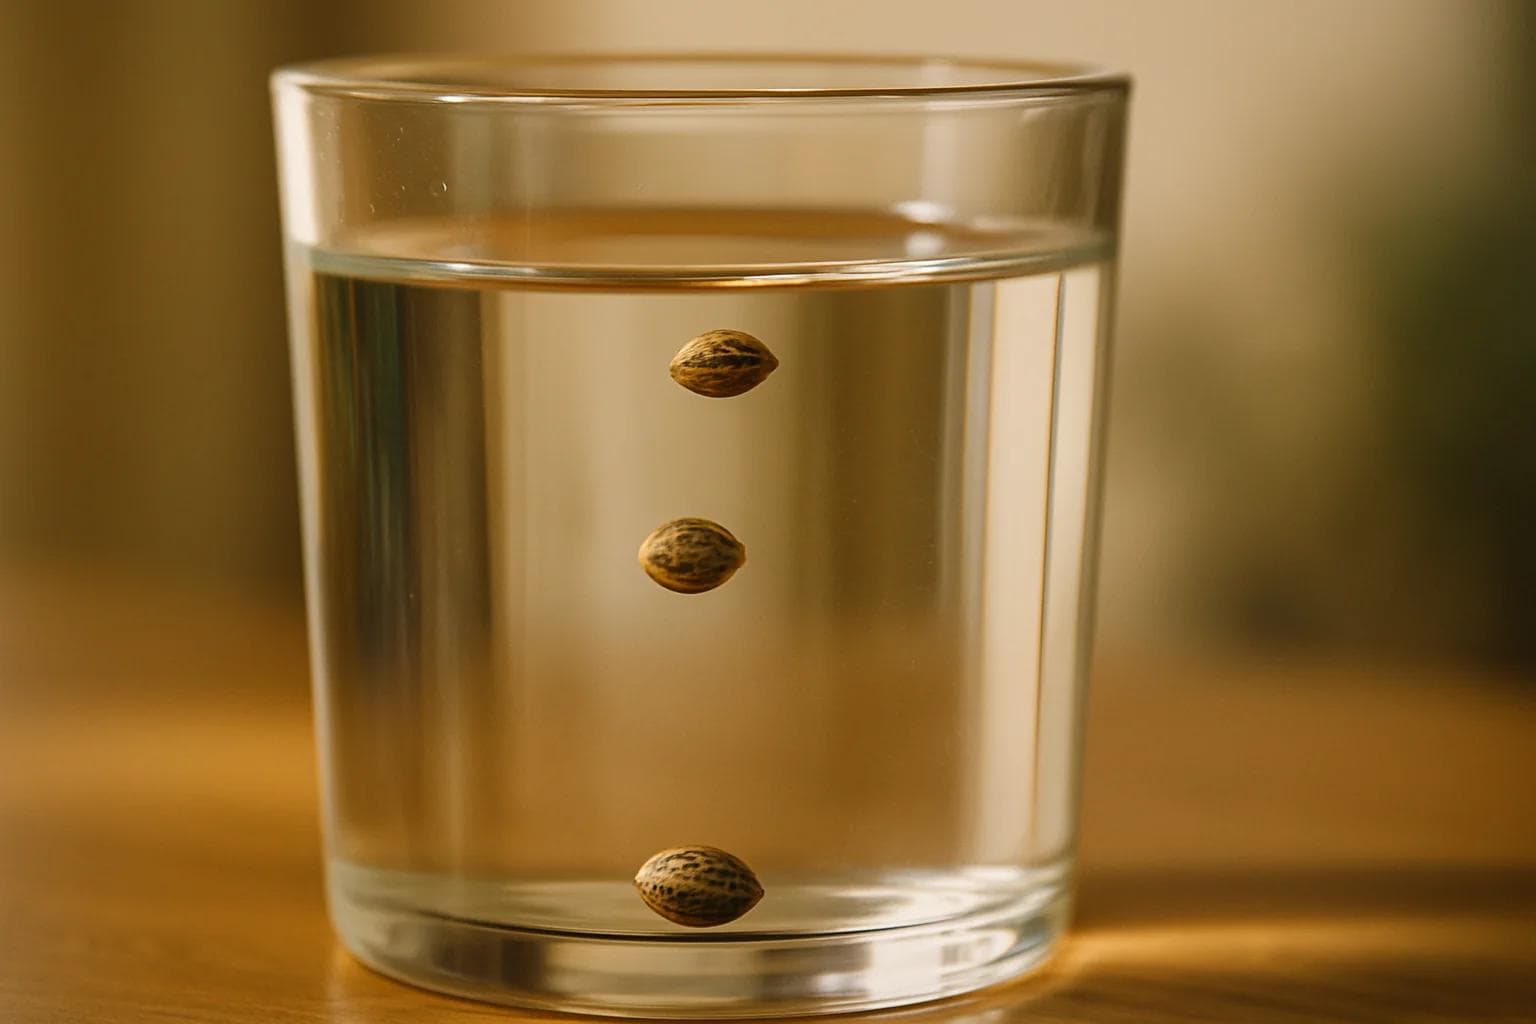
Should Cannabis Seeds Float or Sink When They're Ready?
A seed that sinks after soaking has absorbed enough water through its coat to trigger imbibition — this is the success indicator. A seed that floats is not necessarily dead; it may still have an intact air pocket inside the shell preventing waterlogging.
The tap test:
After 12 hours, gently press any floating seeds to the bottom of the glass with a clean instrument. If they stay down: water has been absorbed and the shell is now denser than the surrounding water — continue monitoring. If they immediately float back up: the coat may be unusually hard or the seed may be hollow. Move these to a damp paper towel rather than extending the soak.
Seeds that sink AND show a visible white radicle are definitively viable and ready to plant. Seeds that sink but show no radicle can still be transferred — the crack may not yet be visible but germination is underway internally.
Do not treat the float test as the final word on viability. Seed Anatomy & Viability — a seed's specific gravity is influenced by its genetic coat thickness, not just viability.
Can You Soak Cannabis Seeds Too Long?
Yes — extended soaking past 24–48 hours deprives the seed of oxygen and can kill the embryo. Cannabis seeds need water to initiate germination, but the embryo also requires oxygen to sustain the metabolic activity triggered by imbibition. Waterlogged seeds in a sealed or low-oxygen environment will drown.
Signs of over-soaking:
- Mushy or soft seed coat that gives under light pressure
- Foul or fermented smell from the water
- Brown or grey discolouration of the emerging radicle
- No radicle emergence after 48 hours in water
- 24 hours: standard endpoint for healthy seeds
- 48 hours: absolute maximum for stubborn hard-shell seeds, monitored closely
- Beyond 48 hours: transfer to paper towel regardless of status — do not extend the water soak further
Should You Soak Feminized and Autoflower Seeds Differently?
The core protocol is the same for both seed types, but timing and post-soak urgency differ. Feminized photoperiod seeds and autoflower seeds both benefit from the same water conditions (20–25°C, pH 6.0–7.0, dechlorinated). Where they differ is in the margin for delay.
Feminized seeds: Standard 12–24 hour soak. Photoperiod genetics are generally tolerant of the transition window — you have 1–2 hours of flexibility between radicle emergence and transfer.
Autoflower seeds: Same soak parameters, but the shorter lifecycle of autoflowering genetics means post-soak delays matter more. An autoflower that sits in water 6–8 hours past radicle emergence is losing days from a lifecycle that may total only 70–80 days from seed to harvest (depending on genetics). Transfer promptly at first radicle emergence — do not wait for a longer tap root.
Old seeds or hard-shell genetics: Consider light scarification before soaking. Run the seed lightly across a piece of fine sandpaper (220 grit or finer) in a figure-eight pattern — just enough to scuff the outer coat, not to breach it. This thin abrasion improves water penetration and can cut soak time significantly. Premium genetics with good storage history typically germinate within 12–18 hours without it.
For seeds that are several years old and stored in suboptimal conditions, a brief hydrogen peroxide pre-soak (3% H2O2 diluted to 1%, 30 minutes) can soften calcified coats and reduce surface pathogens before the main water soak.
What Should You Do After Soaking Cannabis Seeds?
Most competing guides end at "plant the seed." The post-soak transition is where a lot of growers lose seeds they thought were fine. A seed with an exposed radicle is at its most vulnerable — it needs consistent moisture, darkness, warmth (22–25°C), and careful handling.
Option A: Transfer to damp paper towel (most common) Lay the soaked seed on one layer of a damp (not wet) unbleached paper towel. Fold the towel over, place it on a flat plate, cover with a second plate, and store in a warm dark place. Check every 12 hours. Paper Towel Method
Option B: Plant directly into pre-moistened medium Place the seed radicle-down, 5–10mm deep in pre-wetted coco, seedling soil, or a peat plug. Do not water again until you see the seedling emerge — the medium should remain moist but not saturated. Direct Soil Germination
Option C: Rockwool cube or Jiffy pellet Pre-soak your cube or pellet in pH 5.5–6.0 water, then insert the seed tip-down into the pre-made hole. Ideal for hydroponic setups.
In all three cases, for the first 24–48 hours after transfer:
- Maintain 22–25°C — use a seedling heat mat if your space drops below 20°C (common in Vancouver or Edmonton basements in winter)
- Keep humidity above 70% — a simple humidity dome prevents the surface from drying before the seedling emerges
- Keep in complete darkness until the cotyledons push through the medium
- Do not overwater — moisture is required, saturation is not
What If Your Seeds Don't Crack After Soaking?
A seed that shows no crack after 24 hours in water is not necessarily dead — it is showing resistance to imbibition through a harder coat. Do not extend the water soak past 48 hours. Transfer immediately to the paper towel method and give germination an additional 24–48 hours in that environment.
Troubleshooting sequence:
- Seeds floated the entire soak: Try the tap test first. If still floating at 24h, transfer to damp paper towel — the paper towel provides physical contact and capillary moisture that the water glass cannot.
- Seeds sank but no crack visible at 24h: Transfer anyway. Imbibition may be complete internally even without a visible exterior crack. The paper towel environment oxygenates the process.
- Seeds cracked but radicle not emerging after 48h in paper towel: Try light scarification on a fresh seed from the same batch. The issue is likely coat hardness. A 30-minute 1% H2O2 pre-soak on a new seed from the batch before the main water soak is worth testing.
- No signs of life across all methods after 72h: The seeds may be non-viable. Check storage conditions — seeds stored in warm, humid environments lose viability significantly within 1–2 years. Well-stored seeds in a sealed container at stable low temperature (5–8°C, dark) maintain viability for 5+ years.
It also starts with the seed. Browse Premium Seeds
FAQ
How long should I soak cannabis seeds in water?
Seeds should soak for 12–24 hours in room-temperature water—this window gives them enough time to absorb water and develop a visible white radicle without risking oxygen deprivation. Most growers see cracks or radicles within 18 hours. Once you see a white root tip breaking through, move them to your next germination medium immediately.
Should I use regular tap water or something else?
Use dechlorinated or filtered water because chlorine can inhibit germination and slow imbibition. If you're using tap water, leave it out for 24 hours to let chlorine evaporate, or use distilled water—either approach ensures the seed gets clean water without chemical interference.
How do I know when seeds are ready to move from water to soil?
When the seed sinks to the bottom of the water and a small white radicle (root tip) becomes visible, it's ready to transfer. Don't wait for a long root to develop—as soon as you see that white tip, place the seed gently into a damp paper towel or pre-moistened growing medium with the radicle facing down.
What happens if I soak the seeds too long?
Submerging seeds for more than 24 hours without monitoring increases the risk of oxygen deprivation, which can kill the developing embryo—especially beyond 48 hours. If you can't transfer your seeds to soil after 24 hours, remove them from water and place them on a damp towel, checking every few hours until the radicle shows.
Do seeds that float mean they won't germinate?
Seeds that float initially often have low viability and are less likely to germinate successfully. If a seed hasn't sunk after 12 hours, you can try gently pushing it down to ensure water contact, but if it keeps floating after 18–24 hours, it's usually better to discard it.
19+ | Educational horticulture only.