
From Seed to Seedling
Germination Guides
Using a Humidity Dome for Cannabis Seedlings — Setup & Tips
Set up the perfect humidity dome for cannabis seedlings. Master temperature and ventilation control to accelerate root development and prevent seedling stress.
A humidity dome creates a humid microclimate that cannabis seedlings need because their roots are too underdeveloped to absorb water efficiently — they drink through their leaves. Maintain 24–27°C (75–80°F) and 65–75% RH, crack vents progressively, and remove the dome once the first true leaves are fully established — typically 7–14 days after sprouting. [CITATION: Minimizing VPD Fluctuations Maintains Higher Stomatal Conductance and Photosynthetic Performance in Lettuce | https://pmc.ncbi.nlm.nih.gov/articles/PMC8049605/]
Most growers lose seedlings not to bad genetics but to bad environment. A humidity dome is one of the simplest tools in early-stage cannabis cultivation — and one of the most commonly misused. Set it up wrong and you get mold, damping off, or leggy seedlings grasping for light. Set it up right and you give your seeds the best possible start, whether you're running photoperiods or autoflowers, growing in Toronto in January or starting spring seeds in a Vancouver garage. Shop cannabis seeds
This guide covers setup, temperature and humidity targets, ventilation timing, condensation diagnosis, and the signs that tell you — clearly — when to remove the dome.
Why Do Cannabis Seedlings Need a Humidity Dome?
Cannabis seedlings need a humidity dome because their root system is too immature to supply water fast enough to meet the plant's needs. In the first days after germination, seedlings absorb moisture primarily through their stomata — the tiny pores on leaf surfaces — rather than through roots. A humidity dome traps evaporated moisture around the canopy, preventing the cotyledon leaves from drying out before roots can take over.
This applies equally to autoflowering and photoperiod genetics. At the seedling stage, both have the same moisture requirements and benefit from the same dome protocol.
The benefit is amplified in low-humidity environments. Growers in Calgary or Edmonton running forced-air heating through winter can see indoor RH drop below 25% — far too dry for seedlings without a dome. Even in coastal cities like Vancouver where ambient humidity is higher, a dome provides a stable, controlled microclimate that ambient air alone cannot guarantee.
How Do You Set Up a Humidity Dome for Cannabis Seedlings?
Setting up a humidity dome correctly takes five minutes. The key decisions are dome selection, surface, starter medium, and initial vent position.
Step 1 — Choose a dome with adjustable vents. Domes without vents force you to physically lift and replace the lid to exchange air. This creates humidity swings and breaks the microclimate you're trying to maintain. Vents are not optional. Standard 10×20 (1020) propagation trays with a dome sized for that flat are the most practical setup for home growers.
Step 2 — Place the tray on a stable, flat surface away from direct heat sources. Avoid positioning the dome directly under HID lights or near space heaters. Radiant heat against the dome wall creates hot spots and uneven temperature distribution inside.
Step 3 — Choose your starter medium. Jiffy pellets, rockwool cubes, seedling-grade coco, or small solo cups with an airy mix (heavy on perlite) all work. The medium needs to hold moisture without waterlogging — seedling roots need oxygen as much as they need water.
Step 4 — Mist the inside of the dome lightly before closing (situational). If your ambient RH is already above 50%, skip this step. If you're in a dry environment — a heated basement in Montreal in February, for example — a light mist on the dome walls helps establish the microclimate faster. Never mist directly onto seedlings.
Step 5 — Close vents fully for the first 1–3 days. Before the seedling has emerged and opened its cotyledons, the priority is moisture retention, not gas exchange. Closed vents are correct at this stage.
Should You Use a Heat Mat With a Humidity Dome?
Yes — especially if ambient temperature is below 22°C (72°F). A seedling heat mat warms the root zone to 24–27°C, which directly supports root development. It also raises the humidity inside the dome as a side effect: a warmer medium evaporates more moisture, which the dome traps.
That interaction matters more than most growers realize. A heat mat doesn't just warm roots — it changes the entire microclimate inside the dome. Without a thermostat, root zone temperatures can exceed 32°C (90°F) quickly, particularly with the dome closed. At that temperature, seedling roots stall and can be damaged within hours. A basic thermostat probe placed at soil level keeps root zone temperature accurate and safe.
For growers in Edmonton or Ottawa starting seeds in an unheated basement or garage in early spring, a heat mat is not optional — it's the thing that makes a winter germination run work at all. The thermostat is part of that kit, not an upgrade.
How Far Should Grow Lights Be From a Humidity Dome?
T5 fluorescent fixtures work well at 5–10 cm above the dome surface. Standard LED grow lights should be positioned 45–60 cm above the dome, depending on wattage. The plastic dome diffuses light slightly — this is actually helpful for seedlings, which do not need intense direct light at this stage.
The real risk is heat accumulation, not light deficiency. Check dome surface temperature by touch: it should feel warm but not hot. If you can't hold your hand against it comfortably, the light is too close or ambient temperature is too high.
Leggy, stretching seedlings under the dome almost always indicate insufficient light, not excess. If seedlings are tall and thin, see our guide on why cannabis seedlings stretch.
What Temperature and Humidity Should You Maintain Under a Humidity Dome?
Target 24–27°C (75–80°F) air temperature and 65–75% relative humidity for sprouted cannabis seedlings. Slightly higher values are acceptable during germination before the seedling emerges — up to 28°C (82°F) and 80–85% RH — but once cotyledons are open, prioritize the lower end of those ranges to reduce mold risk.
The table below gives practical targets across each early-life stage:
What Humidity Level Is Best Inside a Cannabis Seedling Dome?
65–75% RH is the target for seedlings with open cotyledons. Before the seedling breaks surface (germination phase), up to 85% RH is appropriate because there is no foliage present to develop mold. Once cotyledons open, begin reducing humidity gradually by cracking vents — the goal is 70–75% by Day 4–5 and 65–70% by Day 7–10.
VPD (vapor pressure deficit) at these temperatures and humidity levels remains in the 0.4–0.8 kPa range, which is appropriate for the seedling stage and supports gentle transpiration without excessive water loss.
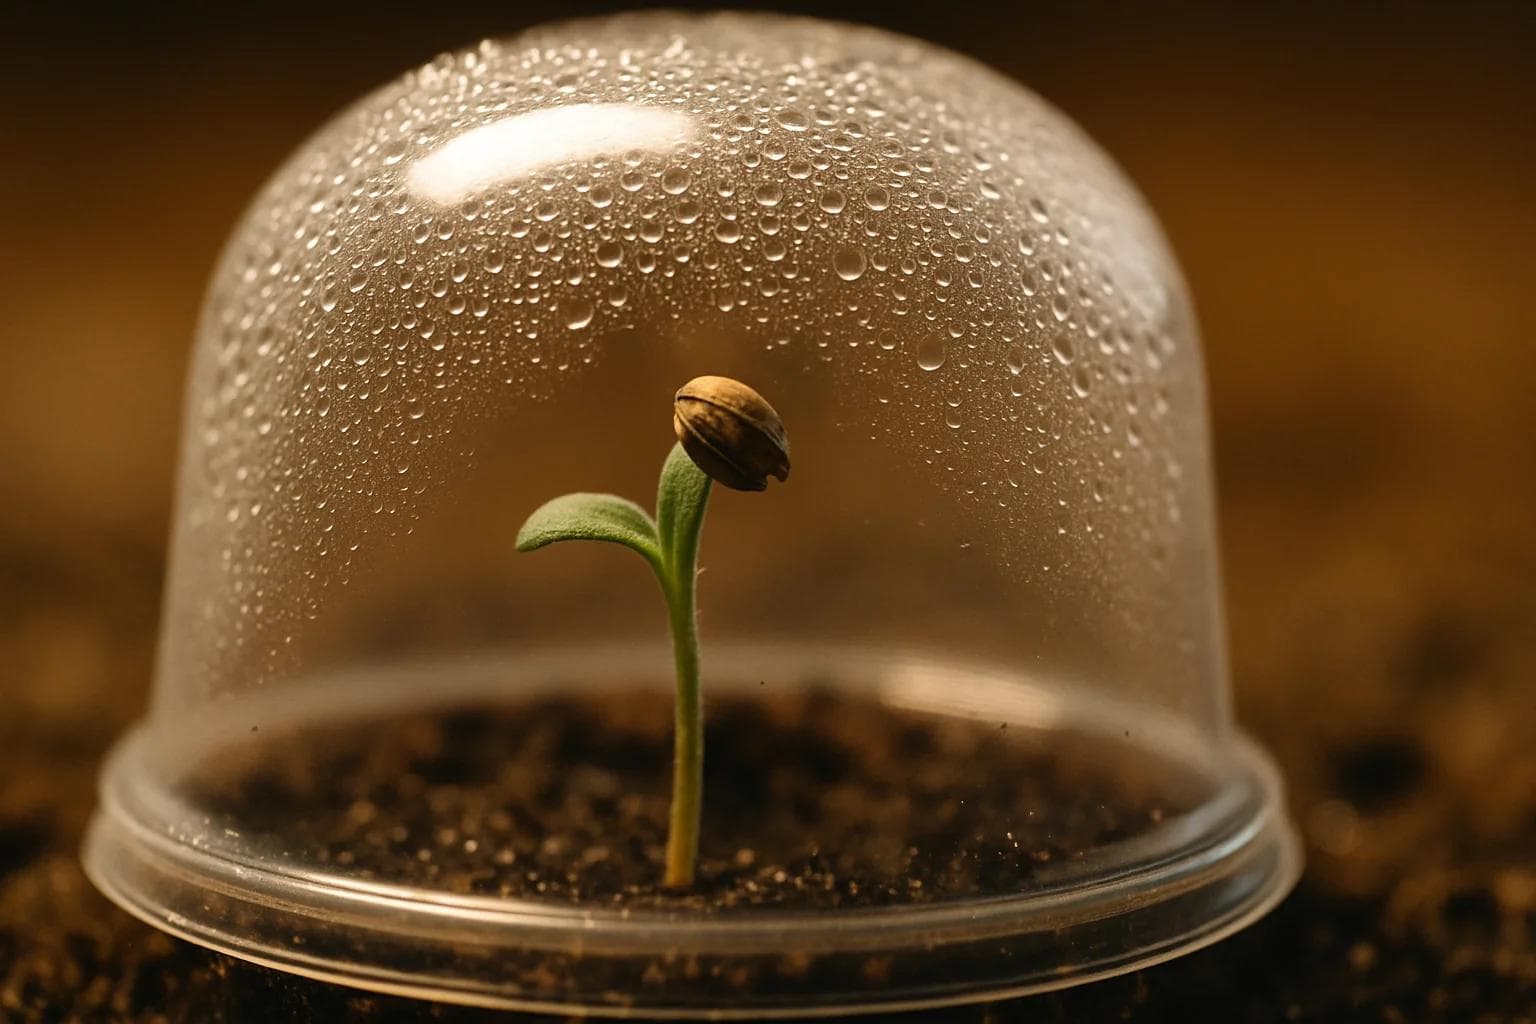
What Does Healthy Condensation Look Like vs. Too Much?
This is the most practical real-time signal you have — easier to read than a hygrometer and available the moment you glance at the dome:
- Light fog on dome walls — The dome is doing its job. Humidity is being maintained. Leave it alone.
- Heavy water droplets running down the sides — Too humid. Crack vents and allow some exchange. Heavy condensation also blocks light reaching your seedlings.
- Dry dome walls, no condensation — The dome is not adding value. Either ambient humidity is already sufficient, or the dome has a gap. If seedlings look healthy, you may be ready to remove the dome entirely.
How Do You Ventilate a Humidity Dome for Cannabis Seedlings?
Ventilation inside a humidity dome follows a deliberate progression: closed, cracked, half-open, fully open, then removed. The goal is never to rush the transition, but also never to stay at a stage longer than the seedling requires.
Three things depend on getting this right:
- CO₂ exchange — Seedlings consume CO₂ for photosynthesis. A fully sealed dome gradually becomes CO₂-depleted. This matters most after cotyledons are open and active photosynthesis begins.
- Mold prevention — Stagnant air at 75%+ RH with no exchange is exactly the environment that Pythium and surface molds need. Opening vents introduces fresh, drier air without crashing the RH to a damaging level.
- Gradual acclimatization — Seedlings that go directly from 75% RH dome to 45% RH open grow space suffer immediate wilting and stress. Progressive ventilation pre-adapts stomata to drier conditions before the dome comes off.
How Do You Prevent Mold Inside a Humidity Dome?
Mold prevention inside a humidity dome comes down to vent management, hygiene, and light exposure. Most dome mold problems are preventable with a basic pre-run and in-run routine.
Before use:
- Wash the dome interior with mild soap and rinse thoroughly. Dry completely before use.
- Inspect for residue from previous grows — old organic material is the fastest mold vector.
- Crack vents by Day 3–4 regardless of seedling stage
- Maintain at least 16 hours of light per day — light suppresses surface mold formation
- Keep the tray clear of standing water and remove any dead seed casings, fallen cotyledon caps, or yellowed leaf material immediately
- Do not mist inside the dome once seedlings are established — the medium provides sufficient humidity
- Remove the dome immediately
- Increase air circulation with a small fan positioned to create gentle indirect airflow
- Reduce watering frequency and allow the soil surface to dry slightly
- If mold is at the stem base at soil level, evaluate for damping off — that requires different intervention than surface mold
When Should You Remove a Humidity Dome From Cannabis Seedlings?
Remove the dome when seedlings have developed their first set of true leaves — not cotyledons — and show visible stem rigidity. This typically occurs 7–14 days after sprouting, but calendar time is a secondary indicator. Read the plant, not the clock.
The observable signs the dome is ready to come off:
- First true leaves are fully open and oriented toward the light source
- Cotyledon leaves are still green and undamaged (yellowing cotyledons at this stage can indicate excess humidity, not nutrient deficiency)
- Stem has developed a slight rigidity — it doesn't fold immediately when brushed lightly
- Roots may be visible at the drainage holes of starter containers, indicating the root system is active and capable of water uptake
- Condensation pattern has shifted from heavy to light (the seedling's own transpiration is no longer spiking dome humidity)
Can You Leave a Humidity Dome on Cannabis Seedlings Too Long?
Yes, and it is a more common mistake than removing it too early. Leaving a dome on too long promotes damping off — stem rot at the soil line caused by Pythium and similar pathogens — as well as surface molds and structurally weak stems. Seedlings build stem strength partly through mild environmental stress: small air movements and slight humidity fluctuation signal the plant to thicken its stem. A permanently sealed dome eliminates that stress signal entirely.
If you're unsure whether to remove the dome, remove it. Most seedlings with established true leaves tolerate normal indoor humidity (40–60% RH) without difficulty. The risk of leaving the dome on too long is higher than the risk of pulling it slightly early.
How Do You Harden Off Cannabis Seedlings After Removing the Dome?
Harden off cannabis seedlings by removing the dome for 2–3 hours on the first day, then increasing exposure by 1–2 hours per day over 3–5 days until seedlings are fully acclimated to open air. This gradual reduction in humidity prevents shock from a sudden transition.
Watch leaf tips during the transition. Slight upward curling in the first 24 hours is normal as stomata adapt. Persistent drooping, yellowing, or canopy wilting means the humidity drop is too fast — slow the progression by one stage.
For the complete step-by-step transition protocol, read our guide on how to harden off cannabis seedlings.
Is the Humidity Dome Process Different for Autoflowers vs. Photoperiods?
No. At the seedling stage, autoflowering and photoperiod cannabis genetics have identical humidity and temperature requirements. The dome protocol above applies to both.
Autoflower growers sometimes hesitate to use a dome because they worry about losing time — autos run on a fixed lifecycle and every day counts. That concern is legitimate, but a properly domed autoflower seedling that starts healthy will always outperform a stressed seedling that skipped the dome to save two or three days. Don't skip it.
The one practical consideration: if you're transplanting autoflowers to their final container at seedling stage to avoid transplant shock, factor the dome removal and hardening-off period into your container sizing decision before you start.
FAQ
How long should I keep the humidity dome on my seedlings?
Keep the dome on for 7–14 days after germination, until the first true leaves are fully established and the plant shows visible strength. Remove it gradually by cracking the vents over 2–3 days to acclimate the seedling to lower humidity. The transition is complete when the plant no longer wilts during the vent-opening process.
What temperature and humidity levels should I maintain under the dome?
Maintain 65–75% relative humidity and 24–27°C (75–80°F) for optimal seedling development. These conditions prevent moisture loss through leaf surfaces while providing warmth for photosynthesis and cell expansion. Use a thermometer and hygrometer inside the dome to monitor levels daily.
How do I prevent mold and damping off disease under the dome?
Start venting from day 2–3 onward by cracking the vents slightly to ensure air exchange and prevent the stagnant conditions fungi need to establish. Water only when the soil surface feels slightly dry—never waterlogged—and remove pooled condensation daily. Ensure your growing medium has good drainage and maintain consistent gentle airflow.
When should I start venting the humidity dome?
Begin cracking the vents on day 2–3 after sprouting to prevent humidity buildup and introduce gentle air movement. Gradually increase vent opening over the remaining dome period so the seedling acclimates slowly to lower humidity. By day 7–14, vents should be fully open before you remove the dome entirely.
What does heavy condensation inside the dome mean, and when should I remove it?
Light condensation on the dome interior is normal and shows the humid microclimate is working correctly. Heavy, persistent pooling condensation indicates humidity is too high or airflow is blocked—crack vents more to allow moisture to escape. Remove the dome entirely once the first true leaves are fully mature and the seedling maintains turgidity in standard indoor humidity (40–60%).
19+ | Educational horticulture only.