
Master Your Indoor Grow
Indoor Growing Guides
When and How to Harvest Cannabis: Trichomes, Flushing & Curing
Know exactly when your cannabis is ready to harvest — trichome colour guide, pistil method, flushing, harvest day steps, drying and curing.
Harvest cannabis when trichomes shift from clear to milky-white, signaling peak THC. The pistil method offers a backup: harvest when 50-70% of pistils darken. After cutting, dry buds in darkness for 7-10 days. For curing, pack dried buds loosely into wide-mouth mason jars filled to 75% capacity and add a 62% Boveda humidity pack. In the first two weeks, open jars once or twice daily—called burping—to exchange air and develop terpene complexity. This final stage transforms good cannabis into premium quality with exceptional flavor.
Overview
You've spent weeks — maybe months — dialing in your environment, feeding schedule, and training. Don't blow it at the finish line. Harvesting cannabis at exactly the right moment is the single biggest factor separating average bud from truly exceptional flower. Chop too early and you sacrifice potency and yield. Wait too long and THC degrades into sedative compounds. Patience in these final days pays off in every jar you open.
Summary
From seed selection to the final cure, every decision you make shapes what ends up in the jar. The harvest and post-harvest process is the last opportunity to honour all the work that came before it — and when done right, the difference is unmistakable. Premium Pheno Seeds genetics are bred for exceptional trichome production and terpene complexity. Give them the finish they deserve.
Curing
Curing is where good cannabis becomes great cannabis. Pack your dried buds loosely into wide-mouth mason jars, filling them to about 75% capacity to leave room for air exchange. Drop a 62% Boveda humidity pack into each jar to maintain ideal moisture levels and protect against mould or over-drying. For the first two weeks, open your jars once or twice daily — a process called burping — for 10–15 minutes to release built-up moisture and replenish oxygen. If you detect any ammonia smell or feel excess moisture, leave the lids off for longer. After two weeks, weekly burping is sufficient. Aim for a minimum cure of four weeks; eight weeks or longer develops genuinely complex terpene profiles and noticeably smoother smoke. Store jars in a cool, dark location throughout.
Drying
The drying phase is where a significant portion of your final flavour profile is either preserved or lost. Rushing it with heat or aggressive airflow drives off terpenes before they have a chance to fully express in the cured product. Target a slow, controlled dry over 10–14 days in an environment maintained at 18–21°C with 50–60% relative humidity. Keep the space dark — UV light degrades cannabinoids — and use a small fan for gentle air circulation, never pointing directly at your buds. Your branches are ready to move to cure when the smaller stems snap cleanly rather than bending, and the outside of the buds feels dry to the touch while still retaining a slight give at the core.
Flushing
If you've been growing in soil or coco with synthetic nutrients, flushing in the final 1–2 weeks before harvest is a widely practised step that many experienced growers swear by for smoother, cleaner-tasting smoke. The process is straightforward: switch to plain, pH-adjusted water (6.0–6.5 for soil, 5.8–6.0 for coco) and run it through your medium to dissolve and carry away accumulated nutrient salts. Some growers use a commercial flushing agent to speed this up, though plain water works well over the full flush window. Signs your flush is working include yellowing fan leaves as the plant draws on its remaining stored nutrients — this is normal and expected. If you're growing organically, with living soil or compost teas, skip the flush entirely. Your microbial ecosystem is already buffering nutrient availability naturally, and flushing would disrupt that balance without any benefit.
Harvest Day Steps
Set your harvest up for success with a few key practices. Start by giving your plant a final 12-hour dark period before cutting — this encourages terpenes to concentrate in the buds rather than off-gas during the light cycle. When you're ready, cut the main stem at the base and work branch by branch. Now you'll make your first big decision: wet trimming vs. dry trimming. Wet trimming means removing fan leaves and sugar leaves immediately after cutting while the plant is still fresh — it's faster, easier to handle, and works well in humid environments where mould risk during drying is a concern. Dry trimming means hanging branches intact and trimming after the drying period, which many growers prefer for a slower dry and better terpene retention. Either way, hang your trimmed branches upside down in your drying space, with enough spacing between them to allow consistent airflow.
Pistil Method
If you don't have a loupe or microscope handy, monitoring your pistils — the hair-like structures that cover developing buds — offers a faster, naked-eye read on plant maturity. Early in flower, pistils are white and straight, indicating active development. As harvest approaches, they curl and darken to orange, red, or brown. A general rule: when 70–80% of visible pistils have changed colour and curled inward, you're entering the harvest window. It's a practical method for a quick daily check, especially useful for first-time growers getting comfortable with the process. That said, treat it as a secondary indicator only. Environmental factors like heat, humidity swings, or even light leaks can cause pistils to darken prematurely without corresponding trichome maturity. Always confirm with a trichome check before making the final call.
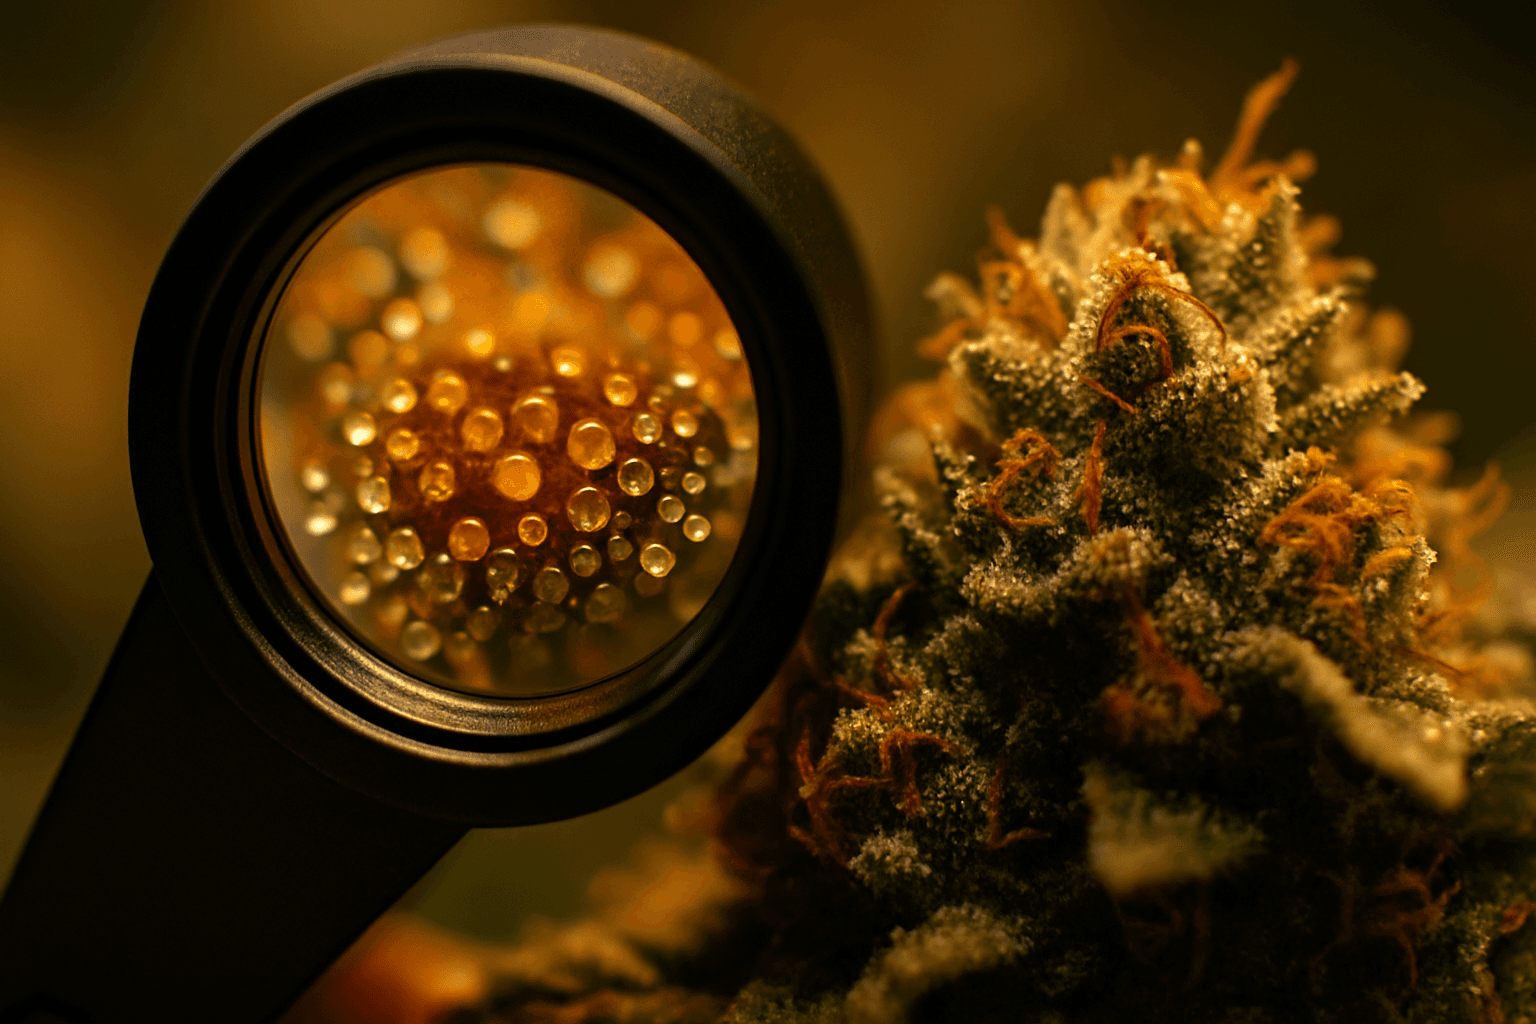
Trichome Check
Trichomes are the definitive measure of cannabis maturity — no other method comes close for accuracy. These tiny resin glands coat your buds and sugar leaves, and their colour tells you everything about where your plant sits in its chemical development. To see them clearly, you'll need a jeweller's loupe (at least 30x) or, better yet, a digital microscope that lets you view trichomes on your phone or laptop screen. Under magnification, trichomes progress through three distinct stages. Clear trichomes mean the resin hasn't fully developed — cannabinoids and terpenes are still building, and harvesting now will leave potency and flavour on the table. Milky white (cloudy) trichomes signal that THC production has peaked. This is the sweet spot for most home growers chasing a cerebral, energetic effect with full terpene expression. Amber trichomes indicate that THC has begun converting to CBN, a mildly sedative cannabinoid. Higher amber percentages produce a heavier, more relaxing, body-dominant effect — preferred by some, but not the goal for most daytime or balanced strains. For the majority of cultivars in your garden, aim for a 70–90% milky trichome ratio with 10–30% amber for a well-rounded, potent result. Indica-leaning strains often benefit from slightly more amber; sativa-dominants are typically best harvested earlier in that window. Check trichomes on the buds themselves, not just the sugar leaves, as leaves mature faster and can give a misleadingly amber reading.
FAQ
What percentage of amber trichomes should I aim for when harvesting?
Most indica-dominant strains benefit from 10–20% amber mixed with predominantly cloudy trichomes for a balanced harvest. Sativa-dominant strains are typically best harvested when trichomes are mostly cloudy with just the earliest amber beginning to appear, as this preserves the energetic, cerebral effect. The specific ratio depends on whether you prefer a more uplifting effect (less amber) or more body weight and relaxation (more amber).
Is a jeweler's loupe necessary, or can I tell trichome color without one?
A jeweler's loupe (30–60×) or digital microscope is essential for accurately reading trichome maturity—individual glands are too small to assess reliably with the naked eye. Without magnification, you risk harvesting too early (losing potency and complexity) or too late (allowing THC to degrade). These tools are inexpensive and the difference they make in harvest consistency and quality is unmistakable.
My plants aren't ripening evenly—can I stagger the harvest?
Yes, you can harvest plants or individual bud sites on different days as they reach your target trichome stage. Trichomes at the top of the canopy mature faster than lower buds, so staggering allows you to harvest each zone at its optimal moment rather than compromising on timing. This approach maximizes both potency and effect consistency across your entire crop.
How do pistil color and trichome color work together as harvest indicators?
Pistil color (aiming for 50–70% orange/brown) serves as a secondary confirmation of what you read in the trichomes under your loupe. Always use the trichome examination as your primary method—this is your most reliable signal. Let pistil color back up your decision and give you confidence that you're harvesting at the right moment.
What's the real difference between harvesting at cloudy versus amber trichomes?
Cloudy/milky trichomes indicate THC is at peak, delivering a more cerebral, energetic effect with crisp, complex flavours. Amber trichomes signal THC is converting to CBN, which adds body weight, sedation, and a heavier feel to the experience. Understanding what effect you want from your harvest should guide your trichome timing.
19+ | Educational horticulture only.